


Installing AsicBoost firmware on an Antminer
Firmware installation: order of work, limits, risks
From version 1.2.7 there is one way to install: writing to NAND through HashCore Toolkit. The SD card is still a tool for recovery and rollback, but not for installation.
What to check before you start
- The ASIC model and its specification, including the chip count. The S19 comes in 76, 88, 120 and 126 chip versions, and those are different files.
- The control board type.
- The release date of the stock firmware. It decides whether the firmware will install at all.
- The ASIC has to be on the network with a known address. Advanced IP Scanner, Angry IP Scanner or Toolkit itself will help you find it.
Compatibility by stock firmware date
| Stock on the ASIC | What to do |
|---|---|
| Before 28 February 2024 | Installs directly |
| March to November 2024 | Roll back via SD card first, then install |
| 1 December 2024 to 28 September 2025 | Installs directly |
| 29 September 2025 and newer, xil, bb, cv boards | Roll back via SD card the standard way |
| 29 September 2025 and newer, aml boards (FR 1.20 and newer) | Only hardware unlocking over UART |
Factory firmware images for the rollback are on the Bitmain stock firmware page, with versions and checksums listed there too.
Installing through HashCore Toolkit
Toolkit scans the network, identifies models and board types by itself and pushes the firmware to a whole group of ASICs at once. For a single unit it beats the web interface too, because it will not let you pick a file for the wrong platform.
- Download and install HashCore Toolkit on a computer in the same network as the ASICs.
- Create a network group and add an address range. You can type it in by hand or import a list from CSV.
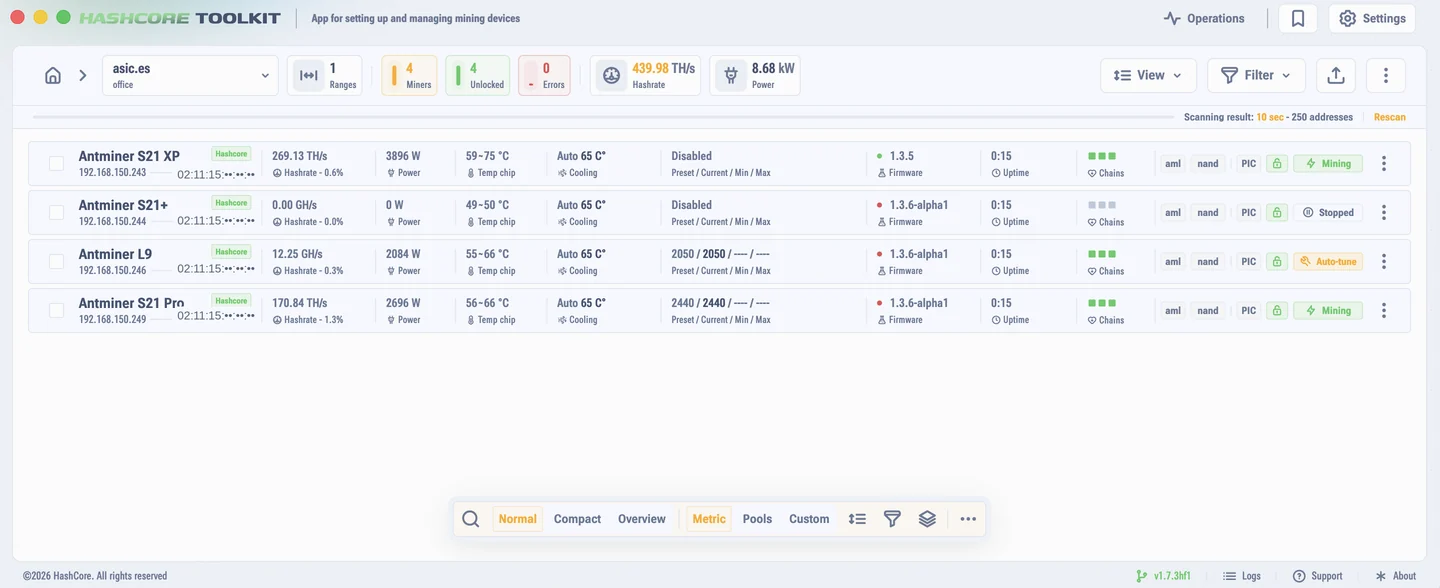
- Open the group and wait for the scan to finish. The list will show the model, the board type and the current firmware version for every ASIC.
- Tick the units you need. For a test start with one, not with the whole rack.
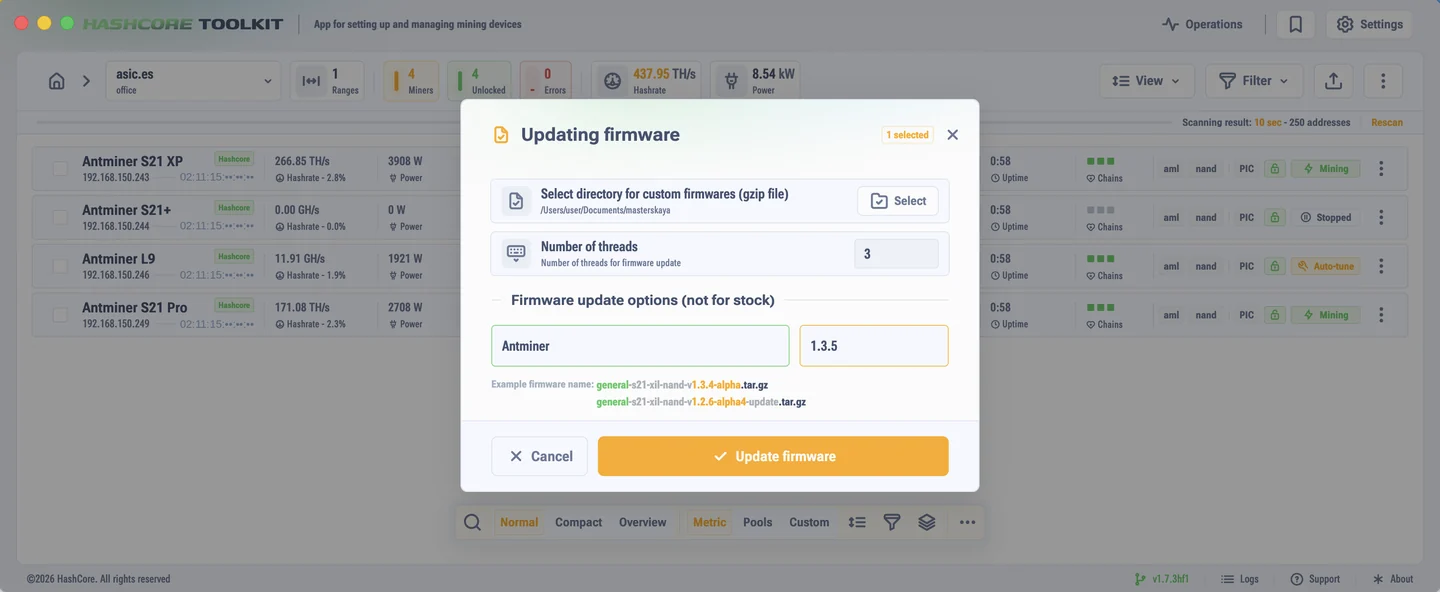
- In the bottom panel open "All operations", pick "Firmware installation", and point to the folder with the files.
- Toolkit fills in the version and the build name from the folder you picked. Check that the platform matches, then press "Install firmware".
Updating from the web interface
Once the firmware is on, updating it from the ASIC itself is easier. The "Update center" button sits at the bottom of the left menu, and if you cannot see it, open the menu with the three bars.
The top of the window shows the model, the controller type and the current version. Below it is the "Keep current settings" toggle: it saves pools, profiles, frequencies, voltages and network parameters and puts them back after the update. On a planned update you leave it on. You switch it off only when you want to start from a clean sheet.
The file is dragged into the upload area or picked with a click. Supported formats are
.tar, .gz and .img. The update button stays inactive
until a file is chosen. After the start the ASIC reboots by itself.
First steps after installation
- Log into the web interface. The default password on AsicBoost firmware is
admin. Therootpassword belongs to Bitmain stock, on custom firmware it will not work. - Check the pools. They usually migrate from stock, but the workers are worth renaming right away.
- Set the cooling mode and the target temperature. For immersion switch fan control off.
- Pick a profile in the performance section. If you do not, autotuning may start, and it takes 3 to 5 hours.
- Save and apply the settings. The ASIC may reboot.
- Change the password in the security section. Especially if the ASIC sits in a hosting facility.
After that it is worth finding your way around the interface: which section does what and in which order to read the numbers is gathered in the section on navigation.